We have been very busy working on creating some fun sessions for you. These sessions (session titles and descriptions) will be located in the SMART Users group in Edmodo soon. If you haven't yet registered for SMARTCon 2014, there is still time. Once you register, you will be sent an invite to join Edmodo (if you don't already have an account); and you will be invited to join the SMART users group. A couple of things to remember:
Bring your charged laptop to SMARTCon 2014 (both July 22 and July 23)
Make sure SMART Notebook 10.8 is installed (we will be at Moore Magnet on Monday, July 21 between 8 and 3 to install the software if it is not already on your laptop)
I was very fortunate this week ... I got to participate in four full days of LEARNING!
Even though I played the role of facilitator and presenter on those days, I not only got to see learning happen for almost everyone there but I also learned many things myself!
For me, any day that I learn something is counted as a good day!
On Tuesday and Wednesday of this week, we participated in CampInspire, where teachers learned, explored, and created using Promethean ActivInspire. (We have pictures to share!).
On Thursday and Friday of this week, we participated in SMARTcon12, where teachers learned, explored, and created using SMARTboard Notebook. (We have pictures to share!).
I have been to several workshops and trainings for both Promethean and SMART before, but I still learned about things I never knew I could do with both products before.
We followed the same format for both mini-conferences. On Day 1, participants were able to choose which sessions they wanted to attend. We had session descriptions to help them choose, as well as a "Two Feet" rule (if you find out a session is not what you thought it would be, feel free to use your two feet and leave to go to another session). On Day 2, participants were given a chance (and time) to use some of the things they had learned the day before to work to create, experiment, and try things out. There were locations for people of similar grade levels or subjects to work in the same area so collaboration and sharing of ideas could take place.
On Day 2 of both sessions, I walked around with a Bloggie or a Flip Camera asking people to tell me at least one thing they learned, an A-Ha moment, or something that really stood out to them. After repeated reassurrances that the videos would not be posted but just used for our group to review, people were excited about sharing what they had learned ... most people even had trouble picking just one thing to share!
I will not post the videos, since I promised I would not, but I will share some of the reoccuring themes from both sessions:
the ability for participants to CHOOSE which sessions to attend
people who were just starting out enjoyed the sessions focusing on the basics
people who had been using the product enjoyed the sessions that went beyond the basics
the format that was used allowing for learning and doing
"There were so many things I did not know that I could do with ________" (insert Document Camera, sound, SMART, ActivInspire ...)
having lots of people around to answer questions
being able to work with others who teach the same level or area
In my mind, these days of inspiration, motivation, and learning were successes ...
The more I reflect on the learning that happened for me and for these teachers, the more I wonder how we can use the things we learned from these experiences to help our students ....
I guess the focus should not only be on what I can do with a certain product, but how I can use the things I am able to do with a product to benefit the learning of students!
SMART Notebook 10.8 was released in August, and I thought I would put some of the new features here in this blog. One of the features that I think everyone will like is the "Clear Ink from Page" option. This is a great new feature. Now, teachers don't have to erase the digital ink from one class to the next, just click on this icon: that is located on the toolbar and it will remove all digital ink from your page (as long as you haven't saved the page with the digital ink).
Another new icon is the clear page icon: This icon will clear the entire page (both digital ink, text, and objects). I really like these two options. Now I don't have to select objects and delete them, just clear the page. Of course, you would have to be certain that you really want to clear that page!
There is a SMART Exchange icon located on the toolbar now. Instead of going to the Gallery or to a web page to find SMART Exchange, just click on this icon: This will be very convenient for us to use. Once a teacher clicks on SMART Exchange, it will take them directly to the login page. Make sure you have registered for SMART Exchange so that you can download notebook lessons. Once you are in SMART Exchange, the last button on the gray bar is a Training button. If you click on this button, you go to the Training page. If you want to learn more about SMART Notebook, Response, Slate, etc. you can take the Needs Assessment and it will give you a learning path if you choose to follow it. Some of the training is free, some have a fee attached.
There have been some additions to the SMART Response also. Something that I really like is that a teacher can now create an answer key for student paced assessments. For instance, if you have a paper test, all you have to do is create an answer key, give the student's the paper test and their clickers, and the students can answer the questions at their own pace. SMART Response will then grade the test for you.
There are some more things that are new in SMART Notebook ver. 8, but I think the above are some of the best. Soon you will be able to update to SMART Notebook ver. 8 from the update menu. You will not have to uninstall your version of 10.7 before updating to version 10.8 (another good thing about this update). There will not be another major update until April, 2012.
The other day a co-worker asked me how to bring back the Smart Board floating tools. These are the tools that are displayed vertically on the left or right side of your desktop. Normally you would click the Smart Board icon in the system tray located in the lower right corner of your desktop and choose “show floating tools”. The problem was that there was no Smart Board icon in the system tray. Let me also say that looking for the information in Google was of little help. Perhaps I did not type in the right key words in the search panel, I don’t know. Anyway, here is what you need to do to bring back the Smart Board icon in the system tray. Open “my computer”, c drive, program files, Smart Technologies and the Smart Board Drivers folder. Locate the Smart Board Tools exe and double click it. This will place the Smart Board icon in the system tray and you will be able to click it and choose “show floating tools”. I hope this helps someone.
In SMART Notebook in the Lesson Activity Toolkit there are many activities that you can use to make your lesson more interactive with students. Here is one that you can create yourself. I call it the Magic Top Hat. With the Magic Top Hat, I can pull out sentence starters, student names, math problems, or anything else that will fit "in" the hat.
To create the Magic Top Hat, first open SMART Notebook. Click on the Gallery tab and type "hat" in the search box. Scroll down the pictures until you see the "Hat - Top Hat" icon and drag it onto your notebook page. Click on the hat object and then click on the green circle at the top of the object and rotate the hat until it is upside down. Make the hat as big as you want it to be by dragging the re-size handle. Next, type in student names, vocabulary words, sentence starters, or whatever you want to put "in" the hat. After typing in the words or numbers you plan on using, you will need to make the font color the same as the hat color.
To change the color of the font to the exact color of the hat, you will need to use the eye dropper in the edit text box. Double click on your text to open the edit text box. Highlight your text, click on the black square (font color), click on the eye dropper, and then click in the area of the hat that you want the font to match. Make sure the size of your font is not bigger than the size of the hat (so that all of the text fits "into" the hat).
Lock the hat in place so that it doesn't move when you pull text out of the hat. Move all the text "into" the hat (actually they are sitting on top of the hat, but since the font is the same color as the hat, the words disappear on the hat). You can now click on the hat and magically pull the text out of the hat!
Video created using my computer, SMART Notebook and Jing.
You have created a lesson in SMART Notebook or ActivInspire and you have found the perfect video clip in Learn360 to enhance your lesson. What do you do with it? In Learn360, change the format of your video to Flash by clicking on the "Switch to Flash" button under Formats. Once the format has changed, click the Download button to download the whole video or a segment of the video. Click Save and choose where to save the video. Always remember where you saved the file.
Open SMART Notebook or ActivInspire (whichever you use). If you are in Notebook, click on Insert and choose Flash Video File. If you are in ActivInspire, click on Insert and choose Media. Find where you saved the video and click on it. This inserts the video directly into your SMART Notebook or ActivInspire Flipchart. You can resize the video by selecting the video and using the resize handles.
This allows you to then save your notebook or flipchart with the video inside of it. You do not have to keep the video you downloaded on your computer after inserting it. When you are sharing your notebook or flipchart, the video goes with it and you do not have to send a separate copy of the video.
I have been going out to schools and conducting staff development on SMART Boards. As I was conducting the staff development several teachers asked if there were handouts for them to refer back to when they got back to their classroom and tried to remember what I had gone over. This got me to thinking about how I could get them information in non-traditional ways. The first thing I did was upload several Quick Reference Guides from SMART Technologies into my wiki for workshop attendees to open and view. Next, I created a glog from Glogster EDU on SMART Board Basics and embedded it into my wiki. Below is the glog I created.
I then created a postcard in Microsoft Publisher that had all the url's that they would need to find my glog, Quick Reference Guides, information on SMART Response Systems, and SMART Slates. I passed them out in yesterday's staff development and showed them how to navigate my wiki. I think the teachers were pleased.
This morning @ShellTerrell posted on Twitter a blog from James Hollis on Invention at Play. This site can be found within Smithsonian's History Explorer, which is a partner site of Thinkfinity. First, be sure to check out James Hollis' blog "Teachers Love SMART Boards". He has some great ideas for using SMART Boards and interactivities.
Invention at Play can be used on interactive white boards and on student computers. One of my favorites is Cloud Dreamer. Students can create their own cloud and then "see it in the sky" to see what it looks like. There is a site on Inventors' Stories where students can read about inventors of different subject areas. For example, under "Recognize the Unusual", inventors of post-it notes and cardiac pacemaker's are listed.
Just like with all of Thinkfinity's partner sites, History Explorer includes lesson plans, activities, interactives, media, museum artifacts, and a professional development tab. The professional development tab is for teachers to learn more about teaching with primary sources and tips on using History Explorer.
A sample lesson from History Explorer that I chose was for K-4 and is "A Letter to Abraham Lincoln Homepage". Within this lesson is the topic that is covered, vocabulary, national standards, and instructional strategy. Also under related resources are several web pages to be viewed. When you view "Our Story: Activities: A Letter to Abraham Lincoln", there is a timeline with the historic time period highlighted, and more activities to do in the classroom.
I highly recommend this site for all grade levels of history and social studies. By the way, all of the above sites are free to use.
If you have a SMARTBoard you are able to have that Document Camera Image show up in the Notebook software so that you can annotate over top of the image on the screen.
Well you can do something similar to that with your younger students using the SMART Table.
With a document camera you will place the items below the lens, whether it is coins or money, shapes or any object that your students will need to identify. Once you have your items placed take a picture of them.
Once you have the image in a format that is compatible with your SMART Table, files with these extensions are common - .jpg, .png, .gif, you can upload it to the table into one of the activity options. One of the most common ones to use with images would be the Hot Spaces.
Once in Hot Spaces you will enter in a name in step 1 to create your activity. Step 2 will provide you the opportunity to insert an image directly on the screen or as a background. You will choose the background option. Browse to the saved image from your document camera and upload it to your Hot Spaces activity.
After you have set the background to the image, you can create your hot space locations and add the item labels that your students will move around to identify the objects, etc. from the background image.
This free eBook details how teachers can deliver meaningful lessons for all types of learners by using the SMART Table interactive learning center. Many studies have shown that early childhood education is the key to academic success and teachers need to help prepare children for a lifetime of learning. As stated in the eBook from the National Association of Elementary School Principals the key principles of a high-quality early-education program are:
Supportive interactions between teachers and students;
Physically and emotionally safe, supportive and engaging learning environments;
Language development, literacy, mathematics, science, creative arts, physical health and development, and social and emotional development;
Meaningful learning for the individual child; and
A culture of authentic assessment and continuous learning that pays attention to all aspects of children’s development.
The eBook outlines:
The Universal Design for Learning (UDL)
The Skills Early Learners Must Develop to Succeed
How the SMART Table Can Assist Teachers in Encouraging These Skills in Young Learners
The SMART Table allows groups of students to explore, move objects, sort items, solve math problems and manipulate images with their hands providing engaging learning experiences for the students. Teachers can also create activities with videos, images and audio files for non-readers. The table comes with a collection of eight applications that teachers can customize to better meet the needs of their students. The SMART Exchange also provides additional applications and ready-made lesson activities for the SMART Table.
The eBook also provides additional information about the SMART Table at: www.smarttech.com/table, and other information.
We have just recently installed, into our Elementary Schools, our fourth SMART Table. Now some of you may be asking... "What is a SMART Table?" The SMART Table is a multiuser, multitouch interactive device that allows young students the ability to learn in a collaborative environment using visual, auditory and tactile senses.
As I was setting up the table the teachers were stopping by with their students to show them what I was doing. You had to be there to fully understand the expressions on their faces as I would show them how they could just touch the table top and it would make the objects move or a video would play. This is my second install of a SMART Table in our district and I have to say that I am excited about the possibilities for the students using the them. The table allows up to 40 simultaneous touches and up to 8 children using it at one time. Now you may think that with all of those little hands the SMART Table would really get dirty and may not function well. The nice thing is that you can quickly clean the surface with any Non-alcoholic-based cleaner.
Not only are the students learning subject material but they are indirectly learning social, thinking and motor skills as well. The table comes with a number of preloaded content and activities to get your students participating right out of the box. You can also add new content and activities to the table via a usb connection and transferring directly into the table's computer. There are a number of resources available online at the SMART Technologies website. As well if you are not sure and still need some additional instruction there are a number of videos and printed materials to get you started on the road to discovery and learning. Check this out for more insight on how to see the big picture as the SMART Solution integrates into your classroom instruction. If you still have questions check out the table FAQ from the Smarttech website.
During this years 2010 NCTIES conference I had the opportunity to sit in on the SMART 10.6 update session. There are lots of new updates for this version as well as a couple of things that will need a little bit of discussion.
So what is the deal with the new software. From what I saw in the workshop the new version 10.6 is a combination of the SMART Math and standard SMART 10.5 software. Now we all know that the SMART Math software has a cost to it, even though there is a dual load capability per license it is still pretty costly in this time of economic turmoil. The new SMART v 10.6 will give you a lot of features of Math version without the cost. The new version offers you an "appetizer" in that it allows you full access to SMART Math tools for ONLY 30 days. The nice thing is that after that 30 days not all of the tools go away, you get to keep a few things that are actually some very nice tools to use.
After you load the software you will notice that there is an additional tool bar which shows up below the standard tool bar but can be hidden if needed.
Measurement Tools: The Icon with the Compass and Protractor You have access to a new Protractor, Compass, Ruler. These tools are different from the original ones from the Gallery. They are more intuitive and practical. Ruler - Trace along the edge, toggle between metric and empirical, numbers stay justified regardless of position and it shows the angle degrees. Protractor - Similar to original except that you have a Green bar that can be adjusted to show the angle, trace along the edge, you can eject the angle onto the Notebook page and numbers stay justified when rotating. Compass - Similar in design to original except new one offers easier adjustments of angle than original, ink matches pen colors and can create both arcs and circles.
There is an addition to the Lines Tool in that you can now create perfect curved lines. On the Shapes Tool you now have additional perfect shapes in a circle and square as well as all triangular shapes.
There are also some great resource options that are available. SMART Exchange Integration - now there is a direct link to the website from the Gallery Tab Training Materials - directly from the SMART Tech website. Online Training - provided in sessions through out the year to help you out. Training Video - Let's you know what is new in Version 10. Learning Management System - Where you can sign up for and participate in online training. Google Search - SMART inspired that filters automatically down to 25 resources. Educator Google Search - Created by an Educator to filter down to 125 lesson resources.
One of my goals in professional development sessions is to provide teachers with quality, usable technology tools for their classrooms. Most teachers want their tech resources to be easy to learn and use (no detailed handouts or pages of notes needed), they want the new tools to have a place in their own classrooms and subject areas, and they want the new tools to save them time.
Livebinders meets all those criteria and by organizing websites and webcontent. The setup is very clear. And if you have an idea of how you'd like to organize select websites around a subject, theme, class schedule, etc... you'll be binding websites together in no time.
Using it in the classroom:
If you have a projector, interactive whiteboard or flatscreen TV, Livebinders is a great way to present websites to your classes. In presentation mode the Livebinder is visually appealing and allows you to quickly jump from webpage to webpage without opening new browsers or tabs.
Your Livebinders can be used in centers on the classroom computers, allowing students to explore a topic or theme while staying on the websites chosen by the teacher.
Your binders can be linked to your webpage or embedded in a blog or wiki. This permits students to access the Livebinder from any connected computer. Livebinders are a great way to collect sites to support or enrich classroom instruction.
Finally, while a Livebinder can be set to "private," many of the livebinders are public and teachers can benefit from the broader community of educators using Livebinders - seeing and using websites other teachers have found.
Livebinders is a functional, easy-to-use addition to any teacher's tech toolbox. Check it out at http://livebinders.com/ and if you're interested in see a few examples first, check out my Livebinders on the SMART and Promethean resources below:
Now that you are staring at a nice, clean, brand new SMARTBoard hanging on the wall in your classroom or rolling around on a stand what do you do with it. Here are a few things that you can do to get started amidst all the confusion and overwhelming thoughts of creating Notebook files.
First of all watch this video, it will help ease the pain a little bit.
Now that you have watched the video take a deep breath and start slow, the biggest thing that you can do to get started working with your SMARTBoard is to actually walk up to it and touch it. Now once you walk up to it and start using it now what do you do with it.
Well you are not alone in this, the Smart Tech website offers you a lot of resources in the way of videos, pdf and hands on practice documents to help get you started. You can view or read lots of information on the new version 10 software, activity toolkit, student response system and many other products available from Smart Tech.
There are many other Online Resources which you can access from the Gallery Tab in the software. You have the SMART Exchange - you can search for content (Notebook files) that are aligned with state curriculum standards, by subject area, share your own resources and connect with other teachers looking for similar information. You can quickly preview and/or download the notebook files and have them up and running in your classroom in minutes. There is also the Educator Resources - where you can search for lesson activities, resources, get ideas for classroom activities, look for curriculum based content, view current new articles and research, check out the community section to talk with others using SMART products around the world. And you can apply for grants to get additional products for your classroom. Lastly you have the Teacher Resources - where you can talk with other teachers around the world who have been using SMART products for a while and those who are brand new and need assistance. Connect with teachers that are working on similar projects and curriculum that you are and work collaboratively to develop new notebook files.
Even though there are a number of online resources that you can use to get information, watch "How to" videos, and talk to other educators around the world there is a wealth of opportunities to get you going right in the software. If you go to the Gallery Tab and then to the Activity Toolkit there are many interactive pages that are Flash enabled which provide you instructions on how to use them and can have your students working collaboratively and interactively within minutes of choosing one of these resources.
A couple of things I can leave you with would be to take little bites, the more you use a SMARTBoard the more comfortable you will become. If you have questions or need help ask, no one will fault you for searching out an answer to a question. Lastly use the resources you have at your finger tips to get you started, whether you are a beginner or have been working with it for years.
Interactive whiteboards (IWB), whether Activ or SMART are great tools for instruction. I've always thought an IWB doesn't make a teacher great, but the addition of an interactive whiteboard in the hands of a great teacher is an amazing tool for learning. I've been lucky enough to see some of these classes in action where the interactive whiteboard has become an integral part of every day's instruction.
So here are some of the better sites I've seen to look for resources for either the Activboard, SMARTboard or both.
Promethean Planet for Activboards and SMART Exchange for SMARTboards are still two of the best places for starting. Each site has downloadable lessons and good resources for their software.
juliethompson.com/SMART (Activ or SMART) This site has a nice collection of links to interactive sites for use on an IWB with K-3 students. Although the site specifically mentions the SMARTboard, most of the sites I checked out could be used on either board.
WPS's smart-lessons (SMART) Great collection of K-12 notebook files by grade level and subject area.
topmarks.co.uk/interactive (Activ or SMART) this site has a lot of free educational materials for IWBs and the downloaded files are in swf which can be inserted into either IWB.
So there's a small list I'd recommend to teachers searching for some resources. Do you know of some I need to add?
Have you ever made a PowerPoint presentation with video in it and felt that shock of horror when the video didn’t play. Of course it worked fine at home or in your classroom. And of course it most certainly did not play when you had your students or their parents watching. No, it’s not the Gremlins. It’s because PowerPoint does not imbed the video. It’s a separate file that must be linked to your slide show. You must bring it with you when you play the slide show on another machine, but additionally the link cannot be changed. In other words, you cannot link the video from your c drive at home and then play it from your thumb drive at school. Linking in other words is a pointer for PowerPoint to find the video every time you play the slide show. Well, the good news is that there are other programs that you have on your computer (or you can load for free) that do imbed the video. These programs are called ActivInspire and Smart Board. The other great thing is that they can be minimized if you need to show the class something and be maximized to go right back where you left off in your presentation. You can’t do this in PowerPoint. Now don’t get me wrong. I am not against PowerPoint. It is a great program when it is used effectively. The issue is that all too often it is used so ineffectively. It’s just that there are other presentation programs that you have available to you that will not send you to the hospital in complete shock and pain. ActivInspire and Smart Board software do not have the custom animations that you may be accustomed to in PowerPoint but that in itself, may be a good thing if you tend to make your slide shows more about the special effects than the actual presentation. Have you ever been to a movie that had great special effects but no story? Well, you get my point. Another thing that the ActivInspire and Smart Board software does is that it allows you to involve your students in your lessons through the use of the wireless tablets. So stop the madness, stop making the PowerPoint slide shows and try the ActivInspire and Smart Board software. Oh, by the way, you can import your PowerPoint slide shows in both ActivInspire and Smart Board. ActivInspire lets you import your PowerPoint slides as objects so that you can edit them once they are in the program.
I was conducting a workshop yesterday on the 21st Century Teacher’s Cart. This includes among many other things a document camera and the wireless tablet all of course connected to a computer. I was showing teachers how they can take a worksheet in paper form and capture the image using the document camera (because a teacher had asked me about this), which by the way is just one of the many uses of the document camera. I also want to point out that I mentioned that teachers should not break copyright violations. I also told them that there is more than just one way to accomplish this task. A teacher at the training had asked about importing the image into a Smart Board Notebook. After showing her how to do this, I told the group that if you have the “created” worksheet in digital form (a Microsoft Word document for example), you could use the “Smart Notebook Print Capture” to bring the worksheet into the notebook. It is a very simple process. You simply open your document. I’m using a Word document in this example, but any file will work as long as you have the program on your computer. Then you choose print. Select “Smart Notebook Print Capture” from the dropdown of the printer choices. This does not actually print anything. In fact, it creates a notebook page for every page in your document or file. So, if your Word document contains 5 pages. Five notebook pages will appear in your Smart Board Notebook. If you lock the pages in place, you can have students write their answers using the wireless tablet and in essence involve your students in your lesson, which of course is a great thing to do. Keep in mind that any Smart Board Notebook can be converted into an ActivInspire Flipchart very easily by choosing “import” from the file menu. The “Smart Notebook Print Capture” is an often misunderstood and most often deleted printer from your computer, mainly because people don’t know what it is or what it can do. It is automatically installed when you download the Smart Board program to your computer. So if you have already downloaded the software, check it out. That is, if you haven’t already deleted the printer.
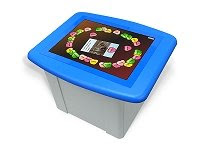
SMART Table Coming Soon – The Smart Table Interactive Learning Center
The table is designed for students pre-school thru sixth grade. Students can create, explore and have collaborative hands-on activities. The table is a multiuser, multitouch table that enables small group learning and collaboration. Students can move from whole class interactive activities on the whiteboard to small group activities at the table. Up to six students can touch the screen at the same time and the activities are designed to encourage collaboration. Students can select or move objects, draw and/or write on the screen simultaneously. The SMART Table uses Digital Vision Touch technology which enables the multiuser and multitouch capabilities.
Teachers can choose from a wide-variety of ready-made lesson activities or they can customize the activities to suit their lessons. Educators who are interested in developing multimedia content for the SMART Table can become a non-commercial member with free access to SMART development tools to create content for the SMART Board products. Free Membership
The table contains a customized PC and projection system that is turned on with a single button. There is a built in 27” screen that can read simultaneous input from an unlimited number of fingers or pen tools. The table measures 29” wide and 25” high and comes with a standard set of interactive learning applications, interactive lesson activities and educational games. The table will also support the SMART Notebook software through the SMART Table toolkit that runs on the teacher’s computer. Through the toolkit teachers can create and/or customize lesson activities and then load the content to the table using a USB key.
Some of the features: Audio Support Object scaling support and object rotation support Wide range of images and backgrounds to make activities more engaging Precise touch control No calibration – ready to use out of the box
SMART Table video on TeacherTube The table will be available in spring 2009 (sometime January – March). The table cost $8,000 and will be available to order in December 2008. To learn more about the SMART Table go to the SMART website – SMART Table.
Information and pictures taken from the SMART Table website.


 that is located on the toolbar and it will remove all digital ink from your page (as long as you haven't saved the page with the digital ink).
 This icon will clear the entire page (both digital ink, text, and objects). I really like these two options. Now I don't have to select objects and delete them, just clear the page. Of course, you would have to be certain that you really want to clear that page!


 SMART Table
