Students may choose to study a second language while in middle school, high school and often while in elementary school. In many instances studying a second language is a high school requirement. Some of the second languages offered at may include French, Japanese, Spanish and Russian.
The North Carolina Department of Instruction has provided a list of responses to questions that you may ask concerning the reasons why studying a second language is important.While enrolled in the second language courses, students not only become speakers of a second language they also learn facts about the counties where the language they have chosen to study is the primary language of choice.
Resources that students may find useful when researching class projects and studying second languages are provided by several organizations. Listed below are links to some of those organizations:
The US Department of the Sate
The UCLA Language Material Project
American Government
US Department of the State Classroom Resources
Monday, August 31, 2009
Thursday, August 27, 2009
The Dreaded Imbedded Video Problem!!!
 Have you ever made a PowerPoint presentation with video in it and felt that shock of horror when the video didn’t play. Of course it worked fine at home or in your classroom. And of course it most certainly did not play when you had your students or their parents watching. No, it’s not the Gremlins. It’s because PowerPoint does not imbed the video. It’s a separate file that must be linked to your slide show. You must bring it with you when you play the slide show on another machine, but additionally the link cannot be changed. In other words, you cannot link the video from your c drive at home and then play it from your thumb drive at school. Linking in other words is a pointer for PowerPoint to find the video every time you play the slide show. Well, the good news is that there are other programs that you have on your computer (or you can load for free) that do imbed the video. These programs are called ActivInspire and Smart Board. The other great thing is that they can be minimized if you need to show the class something and be maximized to go right back where you left off in your presentation. You can’t do this in PowerPoint. Now don’t get me wrong. I am not against PowerPoint. It is a great program when it is used effectively. The issue is that all too often it is used so ineffectively. It’s just that there are other presentation programs that you have available to you that will not send you to the hospital in complete shock and pain. ActivInspire and Smart Board software do not have the custom animations that you may be accustomed to in PowerPoint but that in itself, may be a good thing if you tend to make your slide shows more about the special effects than the actual presentation. Have you ever been to a movie that had great special effects but no story? Well, you get my point. Another thing that the ActivInspire and Smart Board software does is that it allows you to involve your students in your lessons through the use of the wireless tablets. So stop the madness, stop making the PowerPoint slide shows and try the ActivInspire and Smart Board software. Oh, by the way, you can import your PowerPoint slide shows in both ActivInspire and Smart Board. ActivInspire lets you import your PowerPoint slides as objects so that you can edit them once they are in the program.
Top Ten Teacher Tips for the New School Year!
Welcome Back Educators!
New year. New students. Fresh start. I know your list is extraordinarily long for the things you must do to set your class up for success. But, there are a few things you need to move to the top of that list - immediately.
In my own words - technology has a substantial impact on classroom engagement, learning and even behavior. Incorporate technology into your classroom and observe the results that follow... As a former high school teacher, I am telling you what I know.
Wednesday, August 26, 2009
21st Century Classrooms
What does a 21st century classroom look like? The subject has inspired a lot of debate and discussion in many school systems. After spending time in the last few weeks at the newly renovated Ibraham, the new Caleb's Creek and Kimmel Farm, I have seen what it can look like and was impressed at the setup for the classroom teachers who were moving in for the first time last week. And I felt the same way at Reagan High's new wing during the Nothing But NETS conference several weeks ago.

It's not about the tools and technology. I've seen incredible teachers who didn't have access to a lot of technology, and I don't believe you can place an ineffective teacher in a technology-rich classroom and expect them to transform into a master teacher. Technology is only a tool for engagement. But the teachers at these new schools will find a wealth of technology to engage students. These new classrooms are outfitted with computers, interactive whiteboards, slates, student response systems and sound systems.
What an amazing setup for teaching students.

The challenge for these new schools will be to use these 21st century classrooms to impact their instruction and engage their students. Teachers may need to revisit their practices. The technology in these 21st century classrooms shouldn't just be an "add-on" to what has always been done. The hope is that these technologies can transform instruction for teachers and students at these new schools. It won't happen overnight, but it was very encourgaing to see the excitement from the teachers in these new classrooms, and their desire to receive the kinds of training that will allow them to realize the potential of these 21st century classrooms.
Did U Know: Document Cameras
Last time, on Did U Know, we discussed how the document camera (doc cam) was able to take still pictures while in either the camera or computer mode.
Let's go one step further and talk about how we can record video with the doc cam, yes...I said record videos. You may not have known that your doc cam could even do this, well it can. Now there are some restrictions to doing this depending on the model doc cam you have so I will explain how each one works.
Lumens doc cam series
We have a number of different ones in the system: DC 152, 155 and 166 (Red Models)

All these models allow you to activate the video recording feature from the software computer mode. You simply select the Record button from the tool bar and then while in a small floating tool bar appears in the center of the viewing area that you click and a display box opens where you name the file and select the location to save it to. Once you do this you are now
 recording all actions through the doc cam. After you have recorded your video click the Cancel Record button in the toolbar.
Now in the DC 166 model doc cam you also have an availability to record directly to the doc cam with the remote control record button. There is one catch, you have to use an SD memory card (similar to what you would have in a digital camera) to record from the digital camera.

AverMedia doc cam series
We have a number of AverMedia doc cams as well that have the same feature to record video through the software, in this case AverVision 3, and here are the steps to follow. While in the software select the movie camera icon from the tool bar, when you do this you will have a dialogue box appear where you will name the file and select the location to save. In the viewing area of the window you will see a flashing REC and time stamp to let you know that the recording is happening. When you are done click the movie camera icon again and it will ask if you want to stop the recording and you will choose the option.
So take a look at your doc cam as more than just a projection device, look at it as another medium for media and content delivery to your students.
Let's go one step further and talk about how we can record video with the doc cam, yes...I said record videos. You may not have known that your doc cam could even do this, well it can. Now there are some restrictions to doing this depending on the model doc cam you have so I will explain how each one works.
Lumens doc cam series
We have a number of different ones in the system: DC 152, 155 and 166 (Red Models)

All these models allow you to activate the video recording feature from the software computer mode. You simply select the Record button from the tool bar
 and then while in a small floating tool bar appears in the center of the viewing area that you click and a display box opens where you name the file and select the location to save it to. Once you do this you are now
 recording all actions through the doc cam. After you have recorded your video click the Cancel Record button in the toolbar.
Now in the DC 166 model doc cam you also have an availability to record directly
 to the doc cam with the remote control record button. There is one catch, you have to use an SD memory card (similar to what you would have in a digital camera) to record from the digital camera.
AverMedia doc cam series
We have a number of AverMedia doc cams as well that have the same feature to record video through the software, in this case AverVision 3, and here are the steps to follow. While in the
 software select the movie camera icon from the tool bar, when you do this you will have a dialogue box appear where you will name the file and select the location to save. In the viewing area of the window you will see a flashing REC and time stamp to let you know that the recording is happening. When you are done click the movie camera icon again and it will ask if you want to stop the recording and you will choose the option.
So take a look at your doc cam as more than just a projection device, look at it as another medium for media and content delivery to your students.
images provided by: AverMedia & Lumens
Monday, August 17, 2009
Resources for Student Career Exploration
It’s never too early to start thinking about a career. Students who are entering elementary school may already have ideas about a future business or occupation. A federal government website called Career Voyagers offers a resource that is designed specifically with students in mind. Within this site students will find links which may be helpful when researching future job trends and careers related to their current interests.
School based career counselors may find the video library, that is divided into video categories, valuable when discussing health related careers, automotive careers and other emerging career fields. In addition to providing student friendly resources, other resources are available for parents and career counselors. (See Guidance- Competency Goal 5 at the following links: Elementary school, Middle school 6-8, and High School)
School based career counselors may find the video library, that is divided into video categories, valuable when discussing health related careers, automotive careers and other emerging career fields. In addition to providing student friendly resources, other resources are available for parents and career counselors. (See Guidance- Competency Goal 5 at the following links: Elementary school, Middle school 6-8, and High School)
Wednesday, August 12, 2009
Nothing But NETS
Last week administrators and leadership in the WSFCS system converged on Reagan High School for the Nothing But NETS technology conference. It involved two full days of sessions related to some of the current technology going on in our district. I finished thinking of what a great opportunity it had been to have contact with the principals and instructional staff in our district and how impressed I was with the participants in my sessions. I heard similar positive things from others session instructors.


Because leadership "buy-in" is critical for the successful integration of technology, I was pleased to see and hear such supportive feedback from the participants at the conference. Principals not only allocate funds for technology and plan the training sessions for the use of technology, but also set the expectations for the use of technology in their schools. Some of the best examples of schools and classrooms using technology in our district come from schools that have strong leaders who promote the use of technology by their teachers and expect to see teachers and students using technology in meaningful ways.
The Nothing But NETS conference was a unique opportunity to connect with those who are currently setting the stage for technology use in their school for the new year.
The Very Frequently Forgotten and Sometimes Deleted “Smart Notebook Print Capture”
 I was conducting a workshop yesterday on the 21st Century Teacher’s Cart. This includes among many other things a document camera and the wireless tablet all of course connected to a computer. I was showing teachers how they can take a worksheet in paper form and capture the image using the document camera (because a teacher had asked me about this), which by the way is just one of the many uses of the document camera. I also want to point out that I mentioned that teachers should not break copyright violations. I also told them that there is more than just one way to accomplish this task. A teacher at the training had asked about importing the image into a Smart Board Notebook. After showing her how to do this, I told the group that if you have the “created” worksheet in digital form (a Microsoft Word document for example), you could use the “Smart Notebook Print Capture” to bring the worksheet into the notebook. It is a very simple process. You simply open your document. I’m using a Word document in this example, but any file will work as long as you have the program on your computer. Then you choose print. Select “Smart Notebook Print Capture” from the dropdown of the printer choices. This does not actually print anything. In fact, it creates a notebook page for every page in your document or file. So, if your Word document contains 5 pages. Five notebook pages will appear in your Smart Board Notebook. If you lock the pages in place, you can have students write their answers using the wireless tablet and in essence involve your students in your lesson, which of course is a great thing to do. Keep in mind that any Smart Board Notebook can be converted into an ActivInspire Flipchart very easily by choosing “import” from the file menu. The “Smart Notebook Print Capture” is an often misunderstood and most often deleted printer from your computer, mainly because people don’t know what it is or what it can do. It is automatically installed when you download the Smart Board program to your computer. So if you have already downloaded the software, check it out. That is, if you haven’t already deleted the printer.
Monday, August 10, 2009
Did U Know: Document Cameras
Session One: Document Camera use in the Classroom
Taking a picture with your document camera
Not only is your document camera great for displaying items that are placed underneath the lens you can also take a photo image of what ever you are working with.
What we have in our district are Lumens and Avermedia Document Cameras. Here are the steps involved to capture images with each of the devices.
Avermedia Document Camera:
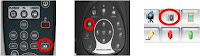 1. Through the Document Camera you can click the Capture button on either the base of the unit or on the remote control.
2. Through the computer software by clicking on the camera button on the toolbar.
Lumens Document Camera:
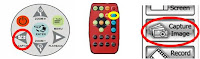 1. Through the Document Camera you can click the Capture button on either the base of the unit or the remote control.
2. Through the computer software by clicking on the camera button on the toolbar.
Once you have captured the image you can view it by selecting the Play button on either remotes or when in the software on the computer just open up the image using the system default viewer. In each model of document camera there is an internal hard drive that allows you to store and average of 80+ images, while using the software you can capture as many images that can be stored onto your computers hard drive.
Tune in for Session 2 on recording video.
Taking a picture with your document camera
Not only is your document camera great for displaying items that are placed underneath the lens you can also take a photo image of what ever you are working with.
What we have in our district are Lumens and Avermedia Document Cameras. Here are the steps involved to capture images with each of the devices.
Avermedia Document Camera:
1. Through the Document Camera you can click the Capture button on either the base of the unit or on the remote control.2. Through the computer software by clicking on the camera button on the toolbar.
Lumens Document Camera:
1. Through the Document Camera you can click the Capture button on either the base of the unit or the remote control.2. Through the computer software by clicking on the camera button on the toolbar.
Once you have captured the image you can view it by selecting the Play button on either remotes or when in the software on the computer just open up the image using the system default viewer. In each model of document camera there is an internal hard drive that allows you to store and average of 80+ images, while using the software you can capture as many images that can be stored onto your computers hard drive.
Tune in for Session 2 on recording video.
images provided by: MyLumens.com, Avermedia.com
Friday, August 7, 2009
Amplified: Students can you hear me now?
 Recently, I participated in a technology conference held at Ronald Reagan High School (RRHS). The school classrooms were equipped with technology workstations. Each workstation include outstanding technology equipment, however, my favorite technology resource on the station was/is the REDMIKE. This classroom sound system has been installed in all recently constructed classrooms at RRHS. With this tool, teachers will be able to maintain the attention of the students without screaming or talking above normal. Other companies that offer this resource include but are not limited to the following:
Document Camera vs. Overhead
Let's run some numbers for the differences between the two.*

Some things to consider:
Do you remember the daily cleanings to try to get all that ink off your arm from those Vis a Vis pens? At least your students knew who you were... right. Oh yes if you bumped the overhead when you were putting it on the table you blew out the bulb. The heat from the unit was great in the winter but horrible in the summer. Plus having to look away from the light too.
Now for the other side of the coin. With a document camera you don't have to worry about "ink arm" anymore. Your students will not know who you are anymore since you will now blend in with them. No more lugging around that heavy overhead or making sure not to bump into anything when you were transporting it. A lot more available features like with the document camera. Video recording, image capture, book imaging, annotation tools (without "ink arm"), just to name a few things.
You make the decision which you would rather use, I know the one I am going to use.
Check out my upcoming blogs on ways to integrate document camera use into your daily instruction.
*average based on device comparison
images provided by MyLumens.com and 3M
Use Google Voice to Tie All Your Phones Together and Have Access To Many Cool Features!
 Google Voice gives you a single phone number that can ring all your phones, saves your voicemail online, and transcribes your voicemail to text. Other cool features include the ability to listen in on messages while they are being left and the ability to make low cost international calls. Calls to Italy for example are 2 cents per minute. Calls anywhere in the United States are free. To start enjoying Google Voice, just give out your Google Voice number. You can record custom greetings for your favorite callers or block annoying callers by marking them as spam.
You have to receive an invitation to create your Google number by going to https://services.google.com/fb/forms/googlevoiceinvite/. After a few days, you will receive an email with a link to set up your Google Voice account. Once you click on the link they send you, you will need to choose your Google number, enter a PIN to access your voicemail by phone, add your forwarding phones such as your cell phones and home phone and verify your phone numbers.
When someone calls your Google phone number, Google Voice will call your cell phone or the phone you have designated in your settings. You can make a call by calling your phone number, pressing 2, then enter the phone number you want to call followed by the pound key. The cool thing is your Google number is the number that is displayed to the people or businesses you call. You can also make calls using your Google Voice account on the web. You can also call a person back from the voicemail by pressing 2. Oh, but there is more! You can do conference calling by calling your Google number and initiating a call. Then have the third party call your Google number. You add them to the call by pressing 5. If needed, you can record the call by pressing 4. Now you can’t say you forgot what your wife wanted you to pick up at the store. If the battery on your work cell phone is getting too low, you can switch to another phone during the conversation by pressing the star button.
You can set which phone you want to ring based on who calls your Google number. You can also set up groups and direct those groups to a specific number when they call. You can set specific callers to go straight to voicemail, the spam folder or block them altogether. In the later case, they will receive a message that the phone number they have dialed is no longer in service, which can be very handy!
You can also listen to the phone messages left on any of your phones by calling your Google number. You can listen to the voicemail as it is being recorded. Press the star key to take the call. Voicemails are automatically transcribed into text by Google. They can even be emailed and SMS to you. You can forward a voicemail via an email to anyone, save a copy to your computer or embed the voicemail in a website or blog. You can also add a call widget to a webpage. They would just click the widget button to call you. Don’t worry, your Google number is kept private. You can receive and send text messages on one or more of your mobile phones. You can reply to a text message from any of your phones or from your Google Voice account. The messages will be stored in your in your Google Voice box.
If this all sounds good to you, sign up for an account today and enjoy the many free benefits that Google has yet again made available to all of us! You've got to love them!
Subscribe to:
Posts (Atom)