... ActivInspire Toolbox that is.
At the top of the toolbox is a button that allows you to "Switch Profile". The default profile is Authoring. That is the toolbox you see above. The first one is At The Board profile. This makes your screen go full screen for teaching purposes. It allows you more real estate in which to write or show your lesson. Another profile is Languages. This changes to toolbox to add spell check, go to web browser, on-screen keyboard, and other items to the toolbox. The Mathematics profile adds a ruler, protractor, compass, dice, xy origin, and calculator to the toolbox. The Media profile adds a camera, sound recorder, and insert media from file icon. I love how you can add different items to your toolbox simply by changing your profile.
The Languages profile allows you to create a tickertape that you can put important messages to scroll across your board. You can change font, color, speed, size, etc. This would be great when you are showing a morning message or something that students need to see during your lesson. Above is an image of the tickertape. When it is live, it scrolls across the screen until you stop it.
To add tools to your toolbox: Click on the Main Menu button (see above), click on File, Settings, Commands. Scroll down until you find the tool you want to add to your toolbox, click on it and click Add.
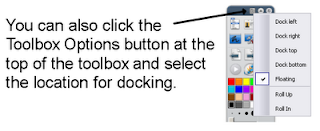
 To move the toolbox: Click on Main Menu, File, Settings, Layout, dock the toolbox where you want it. For example, dock top, dock bottom, dock left, dock right, or leave it floating. If you have younger students, you may want to dock the toolbox on the bottom in order for them to reach it.
Another way to choose where you want the toolbox to be is to click on the first button (see image below):
Stay tuned for more information on what some of the tools can do in the toolbox. One of my favorites is the shapes tool. But then, that is a whole different post.


No comments:
Post a Comment